
How To Create Your Own ERC-20 Token in a Few Minutes
Ever wanted to get rich with your very own coin?! Well, let me just tell you – this guide is going to help you get started… with just becoming more knowledgeable, but not adding any money to your real-world wallet (haha).
Amongst all of my coding lately, dApps/Web3 is definitely a huge part of the learning, so today we’re just going to be walking through the process of building and deploying your own coin / smart contract on the test network.
BEFORE WE CAN GET STARTED
Unlike in our last Python snippet where I made fun of recipe sites for their long intros and text-heavy tutorials, before we can get to the code today, we do need to dive into a few key terms & pieces of information.
What are Smart Contracts?
Trust is something we don’t give to many people or things; smart contracts on the other hand allow us to no longer need to trust a third party, instead, we can trust the contract (or transaction) is being self-executed within a trusted network by computers.
Let’s break it down into three simple items:
- An agreement is made between two parties in the form of computer code; this then runs on the blockchain, it’s stored in a public database, and it cannot be changed or modified.
- The contracts (again – also known as a transaction) are processed, all automatically, and without a third party – no one to rely on at all.
- The transaction is ONLY completed when the conditions in the agreement are met – no issues of trust or delays, all completed based on the contract.
What could be a real-world example of this idea?
There is a beautiful brand spanking new Omega Railmaster for sale online – as someone who hates salespeople, commission, extra fees, etc – you agree on a price of 1.75ETH (roughly $4,500 USD as of writing) with the retailer. That makes your contract simple – once ETH has been received, the watch ownership will become yours and will be delivered. The price is locked, there can be absolutely no changes, all information is public, and is documented.
Short and simple version – they are simply programs that run on the blockchain when a set of predetermined conditions are met.
What are Decentralized Applications (dApps)?
Writing an application right now is simple; you write code, store information in a database, manage a server (or cluster of servers), load balance, ship new code, etc. This is all “centralized” in that the app will not work unless it’s in contact with its server. Ship out broken code, server(s) go down, etc – the app will fail for all users. Think of Facebook, Twitter, NetFlix, etc.
Decentralized applications – aka dApps – are a bit different; they run on the blockchain network – rather than connecting to a copy of your application, you instead download a smart contract to your device which creates a new “block” in the chain. This means the application runs across a Peer to Peer (P2P) network of computers versus a connection to a “centralized” location.
I could write an entire post as to the pro’s and con’s of each – let’s just say do your research before you make a decision on how you want to build and scale your application; some of the links below are well written and contain more information on this exact topic.
Reading Material:
ERC-20 Tokens?!
The ERC-20 (“Ethereum Request for Comment”) is considered the technical standard used for all smart contracts on the Ethereum blockchain as it provides a list of rules that all tokens must adhere to – some of these rules include how tokens can be transferred, how contracts are approved, how data about a token can be access, the total supply of tokens, etc.
ERC-20 is similar to cryptocurrencies such as Bitcoin, Litecoin, etc; they have value and can be sent and received, but instead of running on their own blockchain, they are issued on the Ethereum network.
Each of these ERC-20 tokens includes six basic functions:
- balanceOf
- totalSupply
- transfer
- transferFrom
- approve
- allowance
These functions are absolutely essential in your token implementation as they are used for determining the total number in circulation, storing and returning balances, making transfer and withdrawal requests, granting approvals, and agreeing to automated transfers.
Reading Material:
Solidity
Solidity is an object-oriented language, which can look similar to JavaScript or even Python, used to create smart contracts that automate transactions on the blockchain.
Smart contracts built with Solidity can be thought of as a way to automate non-business and business processes between different people and/or organizations; this helps to ensure that people making the transactions on the blockchain do not have to distrust the process, worry about fraud, or even being able to use the same currency.
Reading Material:
MetaMask
MetaMask is simple – it’s a browser plugin that serves as an Ethereum wallet that can store ETH along with any other ERC-20 tokens while also being able to interact with dApps within the browser/device (you will need this installed to continue).
Once installed, enabled, and connected to your wallet – you can use it for rewards on websites, stake tokens in gambling, spend stars/coins within games, and it’s all done over the trusted decentralized exchanges.
Note: Please, please, please – for the love of God – do NOT ever share your MetaMask “Secret Backup Phrase” or accidentally upload this information into something such as a public GitHub repository.
Reading Material:
Remix
The Remix IDE, much like MetaMask, is quite simple to understand – it’s an insanely powerful open-source tool that helps you to write your Solidity contracts straight from the browser. It’s written with JavaScript and supports usage from within the browser, but can be used locally and in a desktop version. Remix includes modules for testing, debugging, and deploying smart contracts along with much, much, more (spend some time reading doc’s).
Reading Material:
Test Network
If we were creating a serious project, we would deploy our smart contract onto the Ethereum mainnet, but because we’re learning and gas ain’t cheap; we will be sticking to a test network. This allows us to use free rETH (more on this in a moment), make modifications (which cannot be done once deployed to mainnet), deploy via Remix, test, tweak, etc – all without costing our real wallet any money.
Reading Material:
LET’S GET STARTED
Building Our Token
In this example, and you’ll of course need to change this for your own testing, we’ll be naming our token ToeBean (TBEAN as the symbol); classes, files, workspaces, etc will be named accordingly to make things easier for you to understand and follow along.
Step #1: Open up Remix IDE
To get started, go ahead and open up the Remix IDE in a new tab; once inside, go ahead and create a new workspace and name it something along the lines of YourCoinName_WorkSpace (ie: ToeBean_WorksSpace) – once done, you should see something like the following:
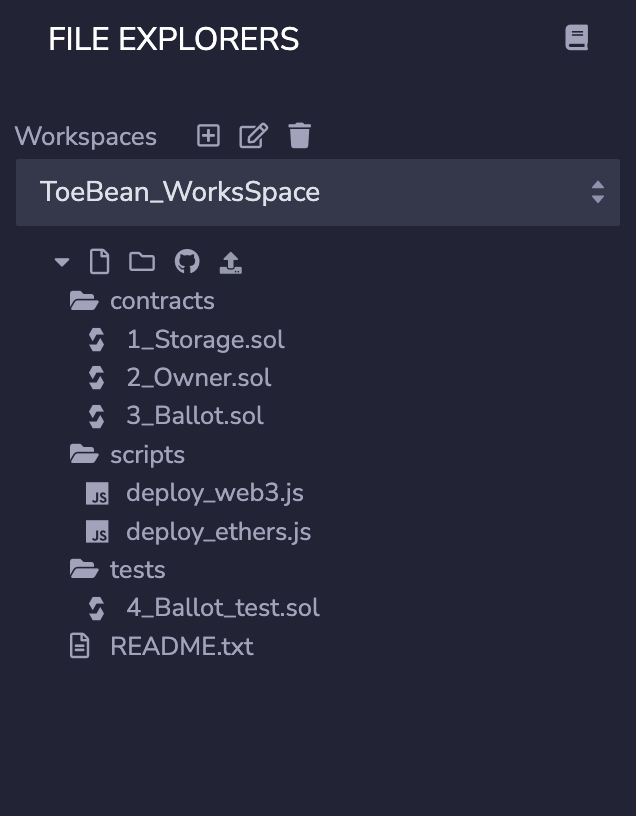
Step #2: Create our Solidity SmartContract
First up, let’s clean things up a little bit and get our files ready; to do that, go ahead and delete the following files within “contracts” folder:
1_Storage.sol2_Owner.sol3_Ballot.sol
Once done, inside of your “contracts” folder, create a new file named YourCoin.sol (ie: ToeBean.sol).
Now let’s get some code; copy and paste the following into your new Solidity file (changing the token name and symbol):
// SPDX-License-Identifier: GPL-3.0-or-later
pragma solidity ^0.8.11;
import "https://github.com/OpenZeppelin/openzeppelin-contracts/blob/master/contracts/token/ERC20/ERC20.sol";

contract ToeBeans is ERC20{

    address public admin;
    constructor() ERC20('ToeBeans', 'TBEANS'){
        _mint(msg.sender, 100);
        admin = msg.sender;
    }

}
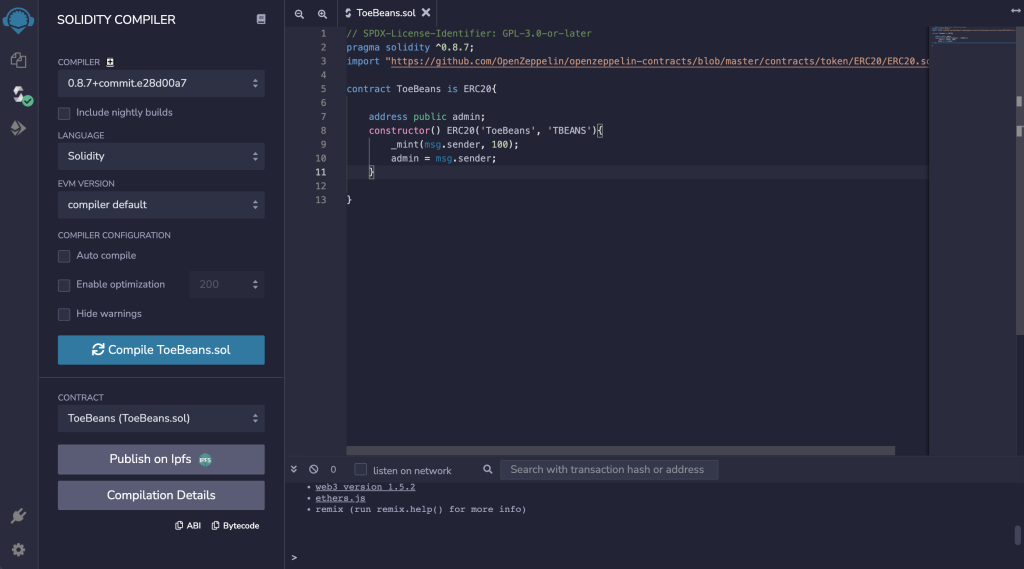
This code is pretty simple – we’re importing the ERC20 to inherit all the required functions for an ERC20, creating a token with the name “ToeBeans,” assigning a symbol of “TBEANS,” minting a total of 100, and assigning all to myself (the creator of the Solidity Smart Contract).
If you’re making more updates, the “Auto compile” checkbox is very handy – if not checked, once done and saved, let’s go ahead and click on the Compile ToeBeans.sol button within Remix:
Step 3: Testing Our Deployment
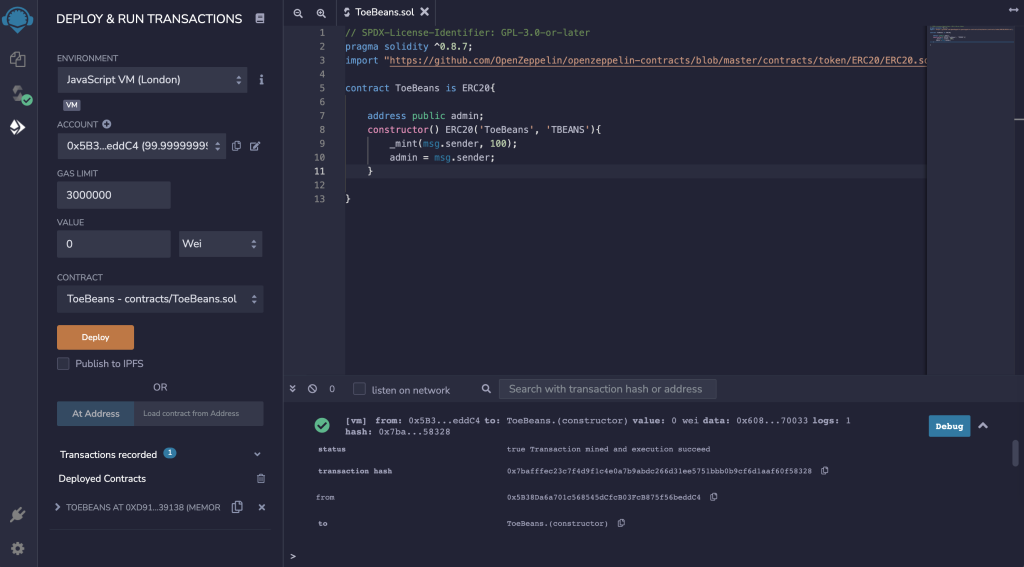
Now that our contract is ready to be deployed, let’s deploy within a “JavaScript VM” inside of Remix. To do this, click on your “Deploy” tab and just ensure the “Contract” is correct and “Environment” is set to “JavaScript VM.” If everything goes smoothly, you should see something like the following with a success response in the console:
More importantly, you should see the following in the bottom left of the screen under “Deployed Contracts:”
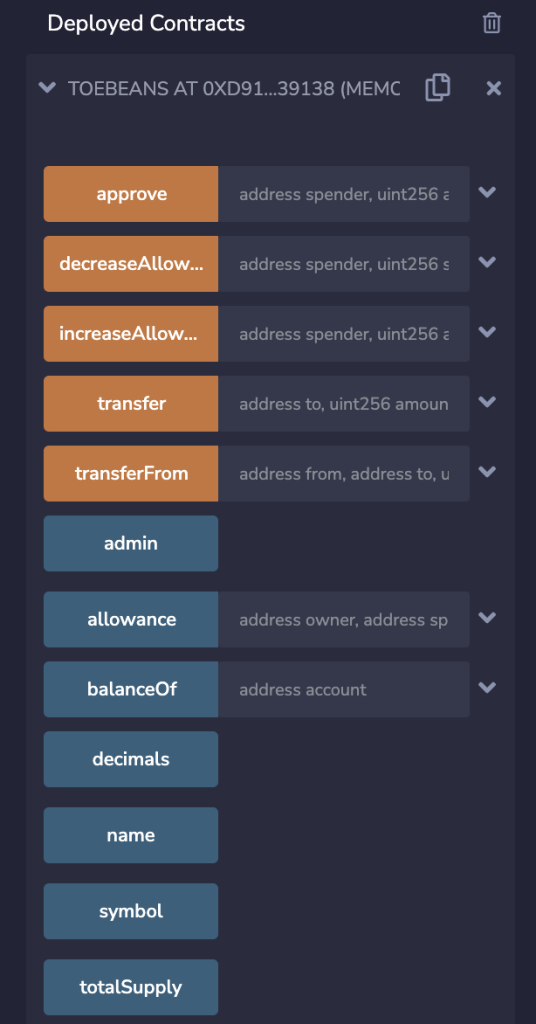
These functions are all of the ones that are available to you; orange means that you will have to pay gas fees and anything that requires changing the balance of an account as they need new blocks saved on the blockchain. The blue ones are anything that just looks through the blockchain to find information; thus no gas is required.
Step 4: Deploying to Ropsten Test Network
Since we’ve compiled our contract, validated it within the virtual machine, and ensured it’s ready for “prime time,” we can now deploy our token over to the Ropsten Test Network.
First things first, let’s change our “Environment” from JavaScript VM to Injected Web3.
Once selected, as long as MetaMask is installed and configured, you should see a small popup asking you to connect MetaMask with Remix. Ensure this is set to Ropsten Test Network as we don’t want to incur any real costs or fees. If you do not see Test Networks available, click on this to read a bit of documentation on adding them to your wallet.
Once configured, we’re going to need some free gas – rETH – to do this, visit any of the following “faucets” to have it send you free rETH.
Ropsten Ethereum (rETH) Faucets
Note: As a reminder, if you’re deploying to a non-test environment, this is going to cost you real ETH (aka real money) for “gas.”
After obtaining the rETH, just like you did with the test in step 3, go ahead and click on the “Deploy” button. This can take a few minutes, but you can watch the progress within MetaMask; once completed, you should see something along the following lines:
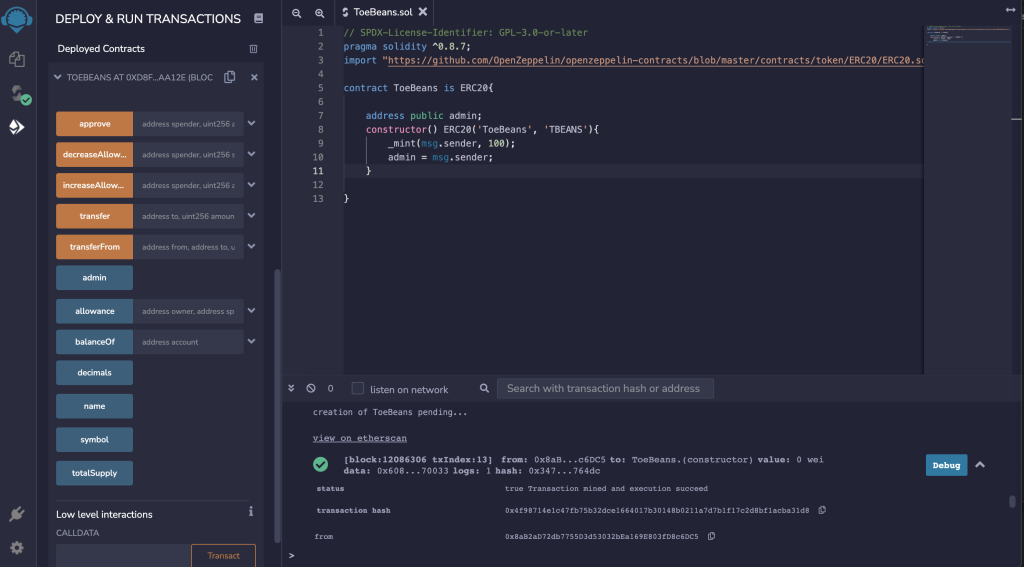
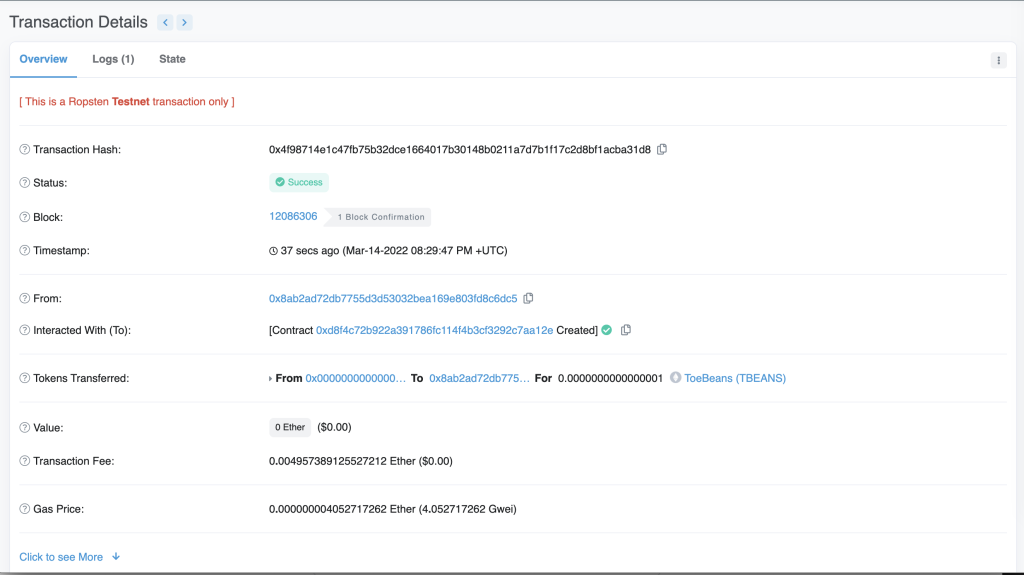
Within the terminal response, you should see a success notice and you’ll see a handy link – “view on etherscan.” If you click on this link, you’ll see all of the information and validation of the contract creation within the blockchain:
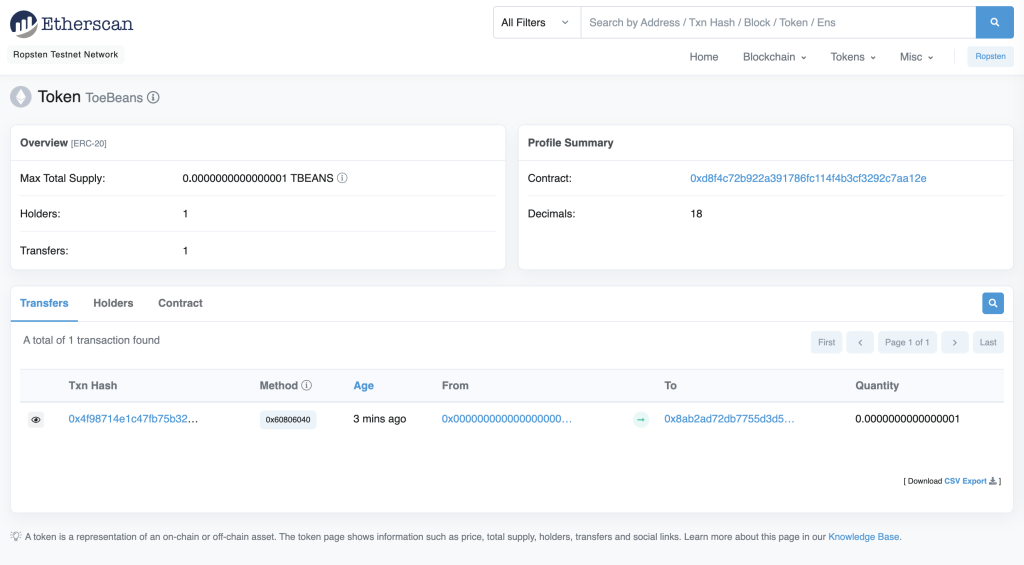
If you actually click on the token itself (within the “Tokens Transferred” section), you’ll see the full details of all transactions/information related to the singular token across all users:
CONCLUSION
There, you’re rich, you happy?! Just kidding, but knowledge is power, right?
You’ve just learned and familiarized yourself on how to successfully create a smart contract (albeit a very basic one), deploy to the Ropsten Test Network, and use Etherscan to review transaction information in a matter of a few minutes. Go read documentation, mess around in Remix, and at a later date, I’ll write a follow-up with more complex scenarios and capabilities of smart contracts (along with the use of Matic.JS, Web3, etc).